Showing posts with label brunch. Show all posts

Wednesday, October 30, 2024

Sweet & Spicy Bacon BLT Sliders

Yum


Sweet & Spicy Bacon BLT Sliders

 1 cup Desert Pepper Peach Mango Salsa

1 package low sodium bacon

¾ cup mayonnaise

1 clove garlic

½ cup sliced green onion

¼ cup parsley

8 toasted Sweet Hawaiian style slider buns

8 tomato slices

¼ teaspoon salt

¼ teaspoon pepper

8 lettuce leaves


Place the Desert Pepper Peach Mango Salsa in a small food processor and puree until smooth. Pour the salsa into a small saucepan and cook, over medium low heat, until reduced, for about 12 minutes. Once the salsa has thickened, remove from the heat and set aside.

 Heat the oven to 400ยบ and line two cookie sheets with foil. Place an oven safe cooling rack in each, lightly spray them with non-stick cooking spray, and evenly lay the bacon slices in a single layer on the racks.  Place in the oven for 15 minutes.

 In a small food processor puree the mayonnaise, garlic, green onion and parsley until smooth.

 Remove the bacon from the oven. Flip each piece over and brush with the salsa and place back in the oven for another 15 minutes, or until the bacon is crisp.

To serve, spread the mayo mixture onto the toasted slider buns. Top each bottom bun half with the tomato slices, salt and pepper, lettuce and bacon.


You can purchase Desert Pepper Salsa products at your local Sprouts, Publix, Hannaford, Harris Teeter, Shop Rite, Walmart, Giant Eagle, Market Basket, Jewel, Meijer


You can follow Desert Pepper on their Website, on Facebook and Instagram 

#desertpepperrecipechallenge #desertpeppertradingco #desertpeppersalsa


Tuesday, September 27, 2022

Cali Style Everything Bagel Avocado Breakfast Stacks

Yum

I definitely prefer savory over sweet when it comes to breakfast dishes. My second entry for Wick’s Pies Recipe Challenge has all my favorite ingredients to start the day off right! You can never go wrong with Everything Bagel Seasoning, especially when it's baked into a buttery flaky pie crust that's then layered with smashed fresh avocado, baby tomatoes, basil and crispy black pepper bacon.


Cali Style Everything Bagel Avocado Breakfast Stacks

2 Wick’s unbaked pie shell

2 Tablespoons everything bagel seasoning 

2 large ripe avocados

1 Tablespoon lemon juice

½ teaspoon garlic salt

15 assorted heirloom cherry tomatoes, quartered

3 slices thick cut black pepper bacon, cooked and chopped

¼ cup minced fresh basil 


Pre-heat oven to 400°.

Lay the unbaked pie shells onto a lightly floured surface and use a 3 ¼ inch round cookie cutter to make circles, re-rolling the scraps if needed, to use up all the dough. I was able to get 20. 

Place dough circles on a large cookie sheet lined with parchment paper.  

Brush each circle evenly with water and sprinkle a thin even layer of the everything bagel seasoning over each one. Place in the oven and bake for 10-12 minutes, or until golden brown. Set aside to cool.

In a small bowl mash together the avocado, lemon juice and garlic salt.

Spoon some of the avocado mash onto 10 of the pie crust rounds. Top each with tomatoes, another pie crust round, and the remaining avocado mash. Sprinkle each evenly with bacon and basil and serve immediately.


You can follow Wick’s Pies here for more recipes and ideas:  Wick'sFacebook InstagramTwitter 

#WicksPies #TrustTheCrust #InCrustWeTrust


Thursday, January 13, 2022

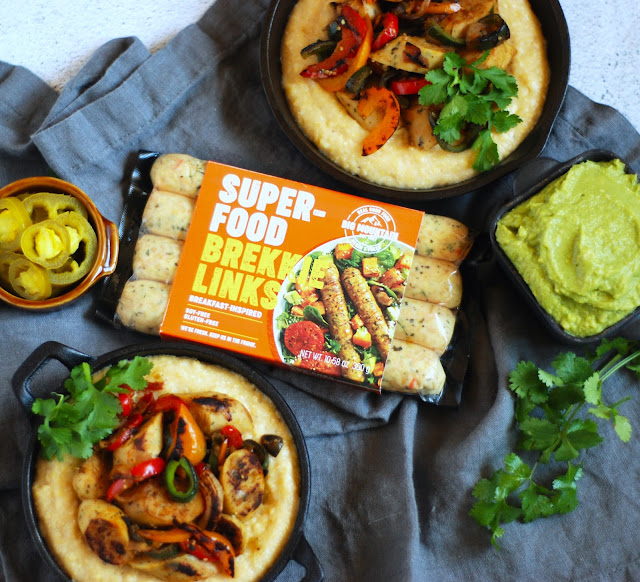
Sausage Fajita & Grits Brunch Bowls

Yum

Here’s my second entry for the Big Mountain Foods Recipe Challenge and it’s Brunch time! Gluten free and Vegan can still be delicious with my Tex-Mex spin on the classic Shrimp and Grits dish that I love so much. Creamy garlic grits are topped with charred peppers, onions and Big Mountain Foods Superfood Brekkie Links tossed in a bright tomatillo salsa. Top it off with guac, cilantro and pickled jalapenos for freshness and all you'll need to decide is whether it's mimosa or margarita time!


Sausage Fajita & Grits Brunch Bowls

 2 cups unsweetened coconut milk

2 cups vegetable stock

1 cup coarse ground yellow cornmeal

1 ½ teaspoons salt

1 teaspoon garlic powder

½ cup thinly sliced onion

½ cup thinly sliced poblano pepper

½ cup thinly sliced red bell pepper

½ cup thinly sliced orange or yellow bell pepper

1 (10.58 ounce) package Big Mountain Foods Superfood Brekkie Links, sliced

¼ cup tomatillo salsa

½ cup guacamole

¼ cup minced cilantro

2 Tablespoons pickled jalapenos


In a medium sauce pot over high heat, bring the coconut milk and vegetable stock to a boil. Whisk in the cornmeal, salt and garlic powder and allow to cook for 8-10 minutes, or until tender and thickened. Cover and set aside to keep warm.

 Heat a large cast iron skillet over high heat. Once the pan is very hot, add the peppers and onions in a single layer. Allow the veggies to char, without stirring for 4 minutes. Stir the peppers and onions and continue to cook for 2 more minutes, allowing the veggies to soften. Push the mixture to one side of the pan and add the sausage to the skillet. Cook for 2 minutes, or until the sausages begin to brown. Stir in the salsa and turn off the heat.

 To serve spoon the grits into bowls, top with sausage fajita mixture, guacamole, cilantro, and pickled jalapenos.

 Serves 4


You can follow  Big Mountain Foods on their website Facebook Instagram and Twitter 

 #BigMountainFoodsRecipeChallenge #BigMountainFoods #Veganrecipes


Monday, December 13, 2021

Yakisoba Breakfast Benedicts

Yum

I am one of  50 bloggers taking part in the “Fortune Noodle Blogger Recipe Challenge”. They sent me a huge package of delicious noodles to work with and this is my entry for their Breakfast category!

I adore Eggs Benedict in all forms so when I heard that this contest wanted a breakfast dish using their noodle products that was my first idea! These are actually super easy to make, especially since the noodle cakes and sauce can be made in advance.


Yakisoba Breakfast Benedicts

1 package (7.7 ounces) Fortune Noodle Hot & Spicy Yakisoba Stir-Fry Noodles

¼ cup water

1 large egg, lightly beaten 

1 ½ teaspoons soy sauce 

1 teaspoon sesame oil

1 tablespoon coconut oil 

4 eggs

½ cup mayonnaise

2 Tablespoons seasoning from the packet in the noodles

2 Tablespoons heavy cream 

3 Tablespoons sliced green onions


Place the seasoning packet aside and put the noodles and water in a microwave safe bowl, cover and microwave for 4 minutes. Remove carefully and set aside to cool slightly.

In a medium mixing bowl, whisk together the egg, soy sauce and sesame oil. Add the noodles to the egg mixture and stir to combine.

Heat a large non-stick skillet over medium heat. Once the pan is hot, add the oil. Scoop ¼ of the noodle mixture in the oil creating 4 small rounds. Cook for 4 minutes, flip and continue to cook the second side for 4 minutes, or until the noodles are crisp on the outside and warmed through. Place finished cakes on a small cookie sheet and keep warm in a 200-degree oven. 

Add 2 inches of water to a large deep skillet and cover. Bring the water up to a simmer over high heat. Crack each egg into a small ramekin. Once the water is simmering, gently lower the eggs into the water. Place the lid back on, turn off the heat and set a timer for 5 minutes. After 5 minutes, remove the eggs from the water with a slotted spoon and place them on a clean kitchen towel to drain.

While the eggs are cooking, whisk together the mayonnaise, seasoning and heavy cream in a small bowl.

To serve place the noodle cakes on 2 plates. Top each with a poached egg, drizzle with the sauce and sprinkle with green onion. Serve immediately.

Serves 2.


#cooklikeawokstar #norulestostirfry #fortunerecipechallenge 

You can follow Fortune Noodle on their WebsiteFacebookTwitterInstagram

You can purchase Fortune products at Safeway, Fred Meyer, QFC, Albertson's, Associated Stores, Cub Foods, United Supermarkets, Roche Bros, Meijer, Shaw's, Stop N Shop, Price Rite, Shop Rite, Wakefern, Price Chopper, Giant, HEB, Walmart and Grocery Outlet

Sunday, June 13, 2021

Cantina Style Shakshuka Skillet

Yum

When it comes to breakfast I am team savory all the way. This delicious baked egg dish is my Tex-Mex spin on Shakshuka, eggs baked in a spicy tomato based sauce, and it reminds me a little bit of Huevos Rancheros thanks to the sauce base - Sam's Fresh Cantina Style Salsa.
Poblano peppers, fire roasted tomatoes and smoked paprika give so much smoky depth to this sauce, you won't believe how quick it comes together.
Pour me a mimosa and pass the bread, it's time for brunch!


 Cantina Style Shakshuka Skillet

2 Tablespoons vegetable oil

1 poblano pepper, diced

1 small onion, diced

1 (14.5-ounce) can chopped fire roasted tomatoes with garlic, undrained

1 (12 ounce) container Sam’s Cantina Medium Salsa

¾ teaspoon salt

½ teaspoon smoked paprika

6 eggs

1/3 cup crumbled queso fresco

¼ cup chopped cilantro

1 warm baguette


Pre-heat oven to 375 degrees.

In a large, oven proof sautรฉ pan heat the oil over medium heat. Sautรฉ the diced poblano, onion and ½ cup water until the vegetables have softened and the water has evaporated, about 10-12 minutes. Add the canned tomatoes, salsa, ½ teaspoon of the salt and paprika and allow the mixture to simmer for 10-15 minutes, or until the vegetables are soft and the sauce has thickened.

Using a spoon, create six wells evenly across the surface of the sauce. Crack the eggs and gently place one in each well. Sprinkle the eggs with the remaining salt and transfer the skillet to the oven. Cook until the whites are cooked through, about 10- 15 minutes.

Remove the pan from the oven, sprinkle with the crumbled cheese and cilantro. Serve with warm baguette, for dipping.

Serves 4-6

I was chosen as one of 30 bloggers to create recipes for "Sam’s Fresh Salsa Blogger Recipe Challenge"! They sent me an awesome care package full of their new fresh salsas to work with and I have really enjoyed creating dishes with them. 

You can follow Sam’s Fresh Salsa on their websiteFacebook or Instagram 

You can find all these fresh, delicious salsas at ShopRite, Acme, and Safeway

#freshnotfake #samssalsarecipechallenge #salsalove

Friday, October 16, 2020

Roasted Garlic Shrimp and Parmesan Polenta with Crispy Garlic Bread Crumbs

Yum

This is my entry for The Jersey Tomato Co Off The Vine Recipe Contest and it is killer!! Growing up in the New Orleans area, I am no stranger to shrimp and grits and this is my Cajun/Italian take on it. Roasted garlic, wine and bacon make the perfect base for the sauce that's loaded with cajun seasoned shrimp. That sauce is then poured on top of a creamy parmesan polenta then topped with Garlic Bread Crumbs for the most insanely crunchy garlicky texture on top. 

Roasted Garlic Shrimp and Parmesan Polenta with Crispy Garlic Bread Crumbs

1 Tablespoon butter

1 Tablespoon oil 

1 ½ teaspoons minced fresh garlic

½ cup panko breadcrumbs

1 Tablespoon minced fresh parsley

2 Tablespoons olive oil

8 slices bacon, chopped

24 ounces shrimp, peeled and deveined

1 Tablespoon cajun seasoning

½ cup dry white wine 

1 (25oz) jar The Jersey Tomato Co. Roasted Garlic Sauce

3 Tablespoons butter

3 cups whole milk

3 cups chicken stock

1 ½ teaspoons salt

1 ½ cups yellow grits or polenta

¾ cups parmesan cheese

½ cup fresh basil leaves, roughly torn


Place the butter and oil in an 8-inch skillet, over medium heat, until the butter is melted. Add the garlic and cook until fragrant, about 1-2 minutes. Add the breadcrumbs and cook until lightly browned and toasted, about 3 minutes. Remove the pan from the heat, stir in the parsley and set aside.

In a large skillet set over medium heat add the olive oil and bacon and allow to cook, about 8 minutes, until crisp. Using a slotted spoon, remove the bacon from the oil and place on a plate to use later. Remove all but 2 Tablespoons of the oil from the pan. Season the shrimp with the cajun seasoning and cook until almost cooked through, about 2-3 minutes. Place the shrimp on the same plate with the bacon. Add the wine to the pan and allow to reduce by half. Add the Roasted Garlic Sauce, reduce the heat to low and allow the mixture to simmer.

While the sauce simmers, make the polenta. In a large stock pot set over high heat, bring the butter, milk, and chicken stock to a low boil. Slowly whisk in the salt and polenta, until the mixture is soft and thick, about 5-8 minutes. Remove from the heat, whisk in the parmesan cheese, cover, and set aside.

Stir the bacon and shrimp into the simmering sauce mixture and allow to heat through.

To serve, divide the grits among bowls, spoon the shrimp mixture over top and sprinkle with fresh basil and garlic bread crumbs.

Makes 6 servings


#JTCOffTheVine @TheJerseyTomatoCo #shrimpandgrits


Tuesday, September 29, 2020

Everything Bagel Bacon & Egg Salad Stuffed Avocados

Yum

As much as I love brunch, I’m not in love with waking up early to prepare it. This 5-ingredient dish is so quick and easy to throw together and packs so much flavor into a tiny gorgeous package, no one will know it only took you 10 minutes to make!

If you’re gluten free and want to make this more substantial, serve it over some spring mix lettuce. If you are a carb lover, serve it with some bagel chips or crusty baguette slices. If you‘re super lazy like I am in the mornings, serve it with mimosas and your guests won’t want to leave! Either way, if you make this, I promise you won’t be sorry.

 Everything Bagel Bacon & Egg Salad Stuffed Avocados

6 hard-boiled eggs, chopped

6 slices cooked bacon, crumbled

2/3 cup mayonnaise

1 Tablespoon Everything but the Bagel Seasoning, divided

6 small ripe avocados


In a medium mixing bowl gently stir together the chopped egg, bacon, mayonnaise and 2 teaspoons of the bagel seasoning.

Cut the avocados in half, remove the pits, peel and place on a serving platter, cut side up.

Spoon the egg salad mixture into the avocado halves and sprinkle with the remaining Bagel seasoning.

Serve immediately.

This is my entry for the Hellmann's Deli Club Brunch Mini Challenge

#minichallenge #HellmannsBrunch #hellmannsdeliclub

Tuesday, August 25, 2020

Grilled Charcuterie Panzanella Salad

Yum
Charcuterie boards are really having a moment right now and I am so here for it! I always, without fail, have a charcuterie board out when entertaining. It's so easy, can be made ahead and has a little something for everyone! Anything goes when I'm putting together a board - clean out your fridge, pantry and veggie drawer! Cheeses, meats, crackers, bread, olives, pickles, veggies, fruit- it's all delicious and really beautiful when placed together making you look impressive with very little work put into it.

When I saw that Stella Rosa wines was hosting a recipe contest looking for grilled dishes to be paired with their wine I knew what I was doing! Grilled Charcuterie Panzanella Salad - it's all of your favorite items from a fabulous charcuterie platter grilled to give it a little extra crisp and smoke and then mixed into this gorgeous salad that pairs perfectly with wine!

If you're not familiar with Panzanella, don't be scared by the name. It's just a traditional Italian salad made with bread, tomatoes and basil. So instead of going the traditional route, I grilled everything and loaded it with all the best from a charcuterie platter! Whether you use it as a side dish, or the main event, I promise you'll love it! Cheers! 

Grilled Charcuterie Panzanella Salad

2 Tablespoons fig preserves

2 Tablespoons sherry vinegar

4 Tablespoons olive oil

6 ounces ciabatta bread

½ cup jarred marinated artichokes, with 1 Tablespoon of the marinade

2 thick slices (3 ounces total) Italian hard salami

1 (6 ounce) ham steak

½ cup mini mozzarella balls

½ cup cubed manchego cheese (or any other sharp firm cheese)

1 cup mixed olives

½ cup cornichon, cut into ¼ inch pieces

4 Tablespoons golden raisins

½ cup multicolored baby tomatoes

3 Tablespoons fresh chopped basil


 Heat a grill to high heat.

 Whisk together the fig preserves, sherry vinegar and olive oil in a large mixing bowl.

Brush both sides of the bread slices with the marinade from the artichokes. Place the bread slices on the hot grill for 2 minutes, watching closely to prevent burning. Flip the bread over and allow the other side to toast and get grill marks. Remove from the heat and cut into ¾ inch cubes.

Place the ham and salami on the grill and allow them to cook and get grill marks on both sides, about 5 minutes. Remove from the grill and cut into bite sized pieces.

Add the grilled bread, salami and ham chunks to the vinaigrette and toss to evenly coat. Add the artichokes, mozzarella, manchego, olives, cornichon, golden raisins and tomatoes and stir. Pour the mixture onto a serving tray, sprinkle with basil and serve with lots of wine. Cheers!

 4-6 servings


Wednesday, December 11, 2019

Pear and Pepper Jelly Blue Cheese Tart

Yum
This is my second entry into the USA Pears Blogger Challenge!
My Pear and Pepper Jelly Blue Cheese Tart is absolutely gorgeous and loaded with decadent holiday flavors. With only 6 ingredients and less than 30 minutes to throw together this may be your new go to appetizer for the season!


Pear and Pepper Jelly Blue Cheese Tart
1 sheet of puff pastry, defrosted 
2 ½ ounces garlic and herb flavored spreadable cheese, at room temperature
1 large ripe Red Anjou pear, thinly sliced
1 egg yolk beaten with a splash of water
¼ cup jalapeno pepper jelly
2 Tablespoons crumbled blue cheese

Preheat the oven to 400 degrees and line a large cookie sheet with parchment paper.
Place the Puff Pastry sheet onto a lightly floured board and lightly flatten with a rolling pin. Poke a few holes with a fork down the center of the pastry. With an offset spatula, spread the garlic and herb cheese in the center of the dough leaving a ½ inch rim around the edges.  Refrigerate for 10 minutes.  
Remove from the refrigerator and arrange the pear slices in rows, slightly overlapping on top of the cheese.  Brush the edges with the egg yolk and bake for 15 to 20 minutes or until golden brown.
Remove from the oven and brush the pear slices with the pepper jelly. Sprinkle with the blue cheese crumbles and serve.

Makes 9 servings.

 #usapears #cookingwithpears @usapears 

Friday, December 6, 2019

Maple Pecan Pear Cake with Maple Cream Cheese Icing

Yum
I think every Friday should involve cake, don't you?
This Maple Pecan Pear Cake is loaded with chunks of juicy pears, crunchy pecans and the perfect amount of maple syrup. The only thing that could make this cake any better is the maple syrup cream cheese icing on top. Since it pairs so perfectly with a cup of coffee, I won't even judge if you have this for breakfast!

Maple Pecan Pear Cake with Maple Cream Cheese Icing

Maple Pecan Pear Cake
1 cup vegetable oil
1 cup vanilla Greek yogurt
4 eggs
1 Tablespoon vanilla
¾ cup maple syrup
¾ cup lightly packed light brown sugar
1 Tablespoon baking powder
1/2 teaspoon baking soda
1/2 teaspoon salt
2 teaspoons cinnamon
3 cups all-purpose flour
2 Bartlett Pears, finely chopped
1 Bartlett Pear, shredded
1 cup chopped toasted pecans

Preheat the oven to 350 degrees and spray a Bundt pan generously with non-stick baking spray.

In a large mixing bowl whisk together the oil, Greek yogurt, eggs, vanilla, maple syrup and brown sugar.

Add the baking powder, baking soda, salt and cinnamon and whisk until combined. With a spatula, gently fold in the flour, chopped and shredded pears and the pecans just enough for the mixture to come together but being very careful not to over-mix. 

Pour the batter into the prepared pan and bake for 1 hour, or until a toothpick in the center comes out clean. 

Let the cake cool in the pan for 20 minutes.

Remove the cake from the pan and transfer to a wire rack to cool completely. 

While the cake is cooling, prepare the icing:

Maple Cream Cheese Icing
1 ½ cups powdered sugar
3 Tablespoons room temperature butter 
2 ounces room temperature cream cheese 
¼ cup maple syrup
1 Tablespoon vanilla coffee creamer

In a small mixing bowl beat the powdered sugar, butter, cream cheese, maple syrup and coffee creamer until smooth. Once the cake has fully cooled, drizzle the icing over the cake. Serve immediately. 


Serves 12-14


 #usapears #cookingwithpears @usapears 

Wednesday, November 20, 2019

Vegan Orange Cranberry Cake

Yum

Anyone out there freaking out over what to serve on Thanksgiving to your Vegan/dairy free/egg free friends for Thanksgiving? I think I have the perfect thing for you!
This is my second entry for the "Florida Crystal's Blogger Challenge". This Orange Cranberry Cake is so easy to throw together and can be made ahead of time, saving you stress and oven space Thanksgiving day. Orange zest and fresh cranberries are one of my favorite holiday flavor combos and since it's not overly sweet, you can totally have it for breakfast the next day if there's any left. I won't tell!

Vegan Orange Cranberry Cake
 1 ½ cups plus 3 Tablespoons all-purpose flour 
1 teaspoon baking soda
½ teaspoon salt
1 Tablespoon orange zest
1 teaspoon white vinegar
1 teaspoon vanilla extract
1 teaspoon orange extract
5 Tablespoon vegetable oil
1 cup water
1 cup frozen cranberries


Preheat oven to 350 degrees and spray an 8-inch square baking pan with non-stick cooking spray.
Place 3 Tablespoons of the flour in a small bowl and set aside.
In a large mixing bowl whisk together the remaining flour, sugar, baking soda, salt and orange zest.

Using a spoon, create 3 wells in the flour mixture (1 large and 2 small). Pour the vinegar into one of the wells, pour the vanilla and orange extracts into the second well and the vegetable oil into the last well. Add the water to the bowl and whisk until the mixture is well incorporated. 
Add the cranberries to the reserved flour and stir until well coated. Gently fold the mixture into the batter and pour into the prepared pan.

Place in the oven and bake for 40-45 minutes, or until a toothpick in the center comes out clean.

Set aside and allow to cool. Once the cake is completely cooled, place it on a serving plate. Dust the top with the powdered sugar and serve. 

Serves 9


You can find more about Florida Crystals by following them hereInstagramFacebook, and Pinterest  and following along for delicious recipe ideas!! Florida Crystals products are available at local retailers


#FloridaCrystals  #FCChallenge #Sweeps #Ad

Monday, August 19, 2019

Back to School Breakfast Ideas!

Yum
As sad as my kids are about it, school starts tomorrow and summer will officially be over for us. To prepare myself and my freezer for the upcoming early mornings I am sharing a list of recipes that I have made before and loved to stock my freezer with!
Are you as obsessed with Pinterest as I am?
I have a page that I call "Tried and True Recipes" where I pin all of the recipes that I've cooked and loved along with notes of what changes or additions I made while cooking it. It's probably my most visited page and I'd love to know if you do something similar!
Here's a list of a few of our favorites. I'll probably make at least 2 from the list today to have a few choices for the kids to argue over in the morning!

DIY Drinkable Yogurts

My son LOVES carrot cake and these muffins are a great healthy version of his favorite dessert


loaded with protein, very good and easy!

 I baked this in a bundt pan and it was so pretty

 I love that these are loaded with oats, zucchini, carrots and raisins

so light and fluffy- I love the ricotta in these!

Pizza Pasta Frittata

 I used dried cranberries instead of diced apple and it was still fabulous

a delicious twist on banana bread that my kids love!

really yummy and easy to make! I leave the walnuts off the top

anything resembling carrot cake is a favorite for my son

apples and cinnamon in a buttermilk banana bread- yum

I love how healthy this one is! I use whole wheat flour instead of spelt flour and I subbed butter for the almond butter

a delicious way to start the day with hidden veggies!

I make this almost monthly and absolutely love it!! Be sure to squeeze any excess moisture form the artichokes and use a thicker salsa so it doesn't get too watery

delicious anytime but especially in the Fall

I seriously make this all the time. It's insanely good and easy to make!

Friday, August 16, 2019

DIY Drinkable Yogurts

Yum
My kids love those bottled drinkable yogurts. They're delicious, most have a decent amount of protein in them and they're easy to grab on busy mornings. The problem I have with most of them is how expensive they are (some are almost $2 a piece) and a lot of them are loaded with sugar especially the ones that are marketed specifically for kids. 
I decided to make my own and it's almost embarrassingly easy to do. 
Still delicious, way cheaper and loads less added (and unneeded) sugar!
You can obviously do any flavor your family likes best, my kids love vanilla the most but strawberry, cherry, blueberry and peach are all winners in this house!

I usually buy the 32 ounce tubs of yogurt and either mix a batch in my Nutra Bullet or a small Tupperware pitcher and then it's ready to pour in the mornings or after school. 
Paired with fresh fruit or toast, it can be a full meal as well!
DIY Drinkable Yogurts
1 cup low fat Greek yogurt (any flavor works)
½ cup low fat milk

Whisk together the yogurt and milk until smooth
Pour into cups with a straw and serve

Are you following me on Instagram yet? If not, please do! 
You can find my latest recipe postings and  updates on Beignet and Roux!


Wednesday, August 14, 2019

Watermelon Mai Tai

Yum
Remember that gorgeous yellow watermelon I made the Watermelon Wedge Salads with Mint Pesto with? I had some cubed watermelon leftover and decided to make a cocktail perfect for the weekend!
My Watermelon Mai Tais are absolute perfection and really make me wish I was still on vacation in Mexico and not gearing up for another school year! I can't believe my kids start on Tuesday and we will find out which teachers we get this afternoon.
What's your favorite tropical drink?
Watermelon Mai Tai
5 ounces spiced rum
3 ounces coconut-flavored rum
4 ounces pineapple juice
4 ounces orange juice
4 ounces watermelon juice
3 cups ice cubes
Mint sprigs, cherries and orange slices for garnish

Place the 4 ounces of the spiced rum, the coconut rum and juices in a pitcher and stir. Fill 2 cocktail glasses with ice and fill with the cocktail. Top each glass off with the remaining spiced rum, garnish the glasses and serve!
Makes 2 cocktails.
Are you following me on Instagram yet? If not, please do! 
You can find my latest recipe postings and  updates on Beignet and Roux!

Jalapeno Popper Pot Pies

Pot Pie is the kind of dish that feels made for a Sunday Supper and this one is no exception. It’s creamy, comforting, and a little spicy – ...