Showing posts with label breads. Show all posts

Wednesday, November 9, 2022

Sweet and Spicy Coconut Shrimp Tropical Flatbread

Yum

My second entry for Sam's Fresh Salsa Blogger contest only has 8 ingredients, takes less than 20 minutes from start to finish to make and is an absolute tropical dream! Sweet and crunchy coconut shrimp are paired with pineapple mango salsa, green chiles, pepper jack cheese and bacon all on a puffy flatbread base. Topped off with cilantro and pickled red onions for freshness, this will be a new family favorite for sure! 

Sweet and Spicy Coconut Shrimp Tropical Flatbread

1 (12 ounces) container Sam’s Fresh Mango Pineapple Salsa, drained

2 ounces chopped green chiles, drained

1 (12 x 7 inch) pre-baked flatbread 

6 ounces shredded pepper jack cheese

¼ cup chopped cooked bacon

8 prepared coconut shrimp, cut in half

1 Tablespoon pickled red onion

1 Tablespoon chopped cilantro


Pre-heat oven to 425° and place a pizza stone or cast iron griddle pan on the top shelf of the oven to pre-heat.

Measure out ½ cup of the Sam’s Fresh Mango Pineapple Salsa and set aside.

In a small bowl stir together the remaining drained Sam’s Fresh Mango Pineapple Salsa and green chiles. Spread the mixture evenly over the flatbread crust. Top with shredded cheese, chopped bacon and coconut shrimp. Bake for 8 minutes.

Remove from the oven and top with the reserved Sam’s Fresh Mango Pineapple Salsa, pickled red onion and cilantro.

Serve immediately. 

2 Servings.


Be sure to follow Sam’s Fresh Salsa here, on Facebook and Instagram

    You can purchase Sam’s Fresh Salsa at ShopRite, Acme, and Safeway. If they are not in your local store, ask them to carry Sam’s Fresh Salsa products!

    #JustAddSalsa #SamsFreshSalsa #CheckTheLabel #samssalsarecipechallenge #freshnotfake


    Tuesday, August 25, 2020

    Grilled Charcuterie Panzanella Salad

    Yum
    Charcuterie boards are really having a moment right now and I am so here for it! I always, without fail, have a charcuterie board out when entertaining. It's so easy, can be made ahead and has a little something for everyone! Anything goes when I'm putting together a board - clean out your fridge, pantry and veggie drawer! Cheeses, meats, crackers, bread, olives, pickles, veggies, fruit- it's all delicious and really beautiful when placed together making you look impressive with very little work put into it.

    When I saw that Stella Rosa wines was hosting a recipe contest looking for grilled dishes to be paired with their wine I knew what I was doing! Grilled Charcuterie Panzanella Salad - it's all of your favorite items from a fabulous charcuterie platter grilled to give it a little extra crisp and smoke and then mixed into this gorgeous salad that pairs perfectly with wine!

    If you're not familiar with Panzanella, don't be scared by the name. It's just a traditional Italian salad made with bread, tomatoes and basil. So instead of going the traditional route, I grilled everything and loaded it with all the best from a charcuterie platter! Whether you use it as a side dish, or the main event, I promise you'll love it! Cheers! 

    Grilled Charcuterie Panzanella Salad

    2 Tablespoons fig preserves

    2 Tablespoons sherry vinegar

    4 Tablespoons olive oil

    6 ounces ciabatta bread

    ½ cup jarred marinated artichokes, with 1 Tablespoon of the marinade

    2 thick slices (3 ounces total) Italian hard salami

    1 (6 ounce) ham steak

    ½ cup mini mozzarella balls

    ½ cup cubed manchego cheese (or any other sharp firm cheese)

    1 cup mixed olives

    ½ cup cornichon, cut into ¼ inch pieces

    4 Tablespoons golden raisins

    ½ cup multicolored baby tomatoes

    3 Tablespoons fresh chopped basil


     Heat a grill to high heat.

     Whisk together the fig preserves, sherry vinegar and olive oil in a large mixing bowl.

    Brush both sides of the bread slices with the marinade from the artichokes. Place the bread slices on the hot grill for 2 minutes, watching closely to prevent burning. Flip the bread over and allow the other side to toast and get grill marks. Remove from the heat and cut into ¾ inch cubes.

    Place the ham and salami on the grill and allow them to cook and get grill marks on both sides, about 5 minutes. Remove from the grill and cut into bite sized pieces.

    Add the grilled bread, salami and ham chunks to the vinaigrette and toss to evenly coat. Add the artichokes, mozzarella, manchego, olives, cornichon, golden raisins and tomatoes and stir. Pour the mixture onto a serving tray, sprinkle with basil and serve with lots of wine. Cheers!

     4-6 servings


    Saturday, December 21, 2019

    Hasselback Ham and Cheese Garlic Bread

    Yum

    Can you really ever have enough super simple appetizer ideas in your back pocket? I really don't think so. Whether it's for Christmas, New Years or Super Bowl I think my Hasselback Ham and Cheese Garlic Bread is just the thing! It's delicious, impressive and super easy -sure to impress at your next get together!  Who doesn't love garlic bread? Combine that with classic ham and cheddar cheese and you get this gooey pull apart bread that can feed a crowd. This is my first entry for the Clifty Farm Blogger Recipe Challenge and I guarantee you if you make this, it will disappear fast!

    Hasselback Ham and Cheese Garlic Bread
    1 baguette
    6 ounces extra sharp cheddar cheese, thinly sliced
    1 stick (8 Tablespoons) butter
    4 large cloves garlic, minced
    1 teaspoon garlic powder
    1 Tablespoon minced chives

    Preheat the oven to 350°F.
    Slice the bread into 1/2-inch slices crosswise, without slicing all the way through. (Leave about 1/4 inch intact at the bottom.)
    Prepare a sheet pan with one large long piece of aluminum foil long enough to wrap the entire loaf in.
    Place the bread on top of the aluminum foil on the baking sheet. Alternate placing pieces of ham and cheese slices in the cuts of the bread.
    In a small sauté pan melt the butter over medium heat. Once the butter is melted, reduce the heat to low and add the minced garlic. Sauté for 3 minutes. Whisk in the garlic powder and chives. Pour the mixture evenly over the bread loaf.
    Fold the foil closed and place the bread in the oven for 12-14 minutes or until the cheese has melted. Serve immediately.
    Serves 8-10
    You can follow Clifty Farm to find out more about their products and free recipe ideas on their Website, on Facebook and Instagram. There's also a $1 off Coupon Link for you to download too! 

    #CliftyFarm #countryham #southerncooking

    Friday, December 6, 2019

    Maple Pecan Pear Cake with Maple Cream Cheese Icing

    Yum
    I think every Friday should involve cake, don't you?
    This Maple Pecan Pear Cake is loaded with chunks of juicy pears, crunchy pecans and the perfect amount of maple syrup. The only thing that could make this cake any better is the maple syrup cream cheese icing on top. Since it pairs so perfectly with a cup of coffee, I won't even judge if you have this for breakfast!

    Maple Pecan Pear Cake with Maple Cream Cheese Icing

    Maple Pecan Pear Cake
    1 cup vegetable oil
    1 cup vanilla Greek yogurt
    4 eggs
    1 Tablespoon vanilla
    ¾ cup maple syrup
    ¾ cup lightly packed light brown sugar
    1 Tablespoon baking powder
    1/2 teaspoon baking soda
    1/2 teaspoon salt
    2 teaspoons cinnamon
    3 cups all-purpose flour
    2 Bartlett Pears, finely chopped
    1 Bartlett Pear, shredded
    1 cup chopped toasted pecans

    Preheat the oven to 350 degrees and spray a Bundt pan generously with non-stick baking spray.

    In a large mixing bowl whisk together the oil, Greek yogurt, eggs, vanilla, maple syrup and brown sugar.

    Add the baking powder, baking soda, salt and cinnamon and whisk until combined. With a spatula, gently fold in the flour, chopped and shredded pears and the pecans just enough for the mixture to come together but being very careful not to over-mix. 

    Pour the batter into the prepared pan and bake for 1 hour, or until a toothpick in the center comes out clean. 

    Let the cake cool in the pan for 20 minutes.

    Remove the cake from the pan and transfer to a wire rack to cool completely. 

    While the cake is cooling, prepare the icing:

    Maple Cream Cheese Icing
    1 ½ cups powdered sugar
    3 Tablespoons room temperature butter 
    2 ounces room temperature cream cheese 
    ¼ cup maple syrup
    1 Tablespoon vanilla coffee creamer

    In a small mixing bowl beat the powdered sugar, butter, cream cheese, maple syrup and coffee creamer until smooth. Once the cake has fully cooled, drizzle the icing over the cake. Serve immediately. 


    Serves 12-14


     #usapears #cookingwithpears @usapears 

    Monday, June 3, 2019

    Chile Relleno Cornbread Avocado Toast

    Yum
    Remember that Chile Relleno Cornbread I made?
    It's absolutely delicious served as a side to a bowl of chili, slathered with butter straight out of the oven or since I can't get enough of  avocado toast - toasted and topped with mashed avocado and fresh tomatoes!
    If you really want to, I bet a fried egg would be amazing on this as well.
    All that's missing is the mimosas and this would be the perfect brunch!
    Tell me what your favorite brunch dish is.....
    Chile Relleno Cornbread Avocado Toast
    2 ripe avocados, mashed
    1/2 cup cherry tomatoes, sliced
    1 teaspoon salt
    1 teaspoon freshly cracked coarse black pepper

    Turn broiler on high.
    Place the cornbread slices on a small cookie sheet and place on the highest shelf of the oven. Watch very closely to prevent burning, and toast for about 3 minutes, or until the bread is browned around the edges. Remove the pan form the oven, flip the bread over and toast the other side, an additional 3 minutes.
    Top each piece of toast with mashed avocado, tomato slices and sprinkle with salt and pepper.
    Serve immediately. 

    Are you following me on Instagram yet? If not, please do! You can find my latest recipe postings and  updates on Beignet and Roux! 

    Wednesday, May 29, 2019

    Chile Relleno Cornbread

    Yum

    I'm super excited to share this cornbread recipe with you today! Whether you eat it straight out of the oven with butter, as a side to a big pot of chili or toasted and cubed to make croutons - it's insanely delicious!
    I've been using poblano peppers more and more lately. I have even been using them in the place of green bell pepper sometimes and I'm loving the results. I feel like they have more flavor and less heat than a jalapeno, but if you can't easily find poblanos feel free to sub a seeded jalapeno instead!

    Chile Relleno Cornbread
     1 cup buttermilk
    1/4 cup canola oil
    2 eggs
    1 cup cornmeal
    1 cup all-purpose flour
    2 tablespoons sugar
    2 teaspoons baking powder
    1/4 teaspoon baking soda
    1/2 teaspoon salt
    1 teaspoon garlic powder
    1/2 cup seeded and finely diced fresh poblano pepper
    1 cup shredded sharp cheddar cheese

    Preheat oven to 375 degrees.

    Whisk the buttermilk, oil and eggs in a large mixing bowl.

    Whisk together the cornmeal, flour, baking powder, baking soda, salt and garlic powder in a medium mixing bowl. Gently stir in the poblano peppers and cheese.

    Combine the dry ingredients into the wet mixture and stir gently until just barely combined.
    Pour the Mixture into a greased 9×5 inch loaf pan and bake for about 30-40 minutes.
    Are you following me on Instagram yet? If not, please do! You can find my latest recipe postings and  updates on Beignet and Roux! 

    Friday, June 22, 2018

    Ham & Swiss Slider Burgers

    Yum
    Have you ever tried those baked slider sandwiches before with the sweet and sticky glaze, ham and melty cheese? They are absolutely decadent and delicious and I think I just raised the bar by making them into burger sliders! My son stopped in the middle of scarfing one of these down and declared 
    "I could live off these for the rest of my life"
    Me too son, me too.
    I swapped the traditional dijon for a spicy brown mustard in the glaze and used Golden Potato pillowy slider buns to soak up all of the buttery glaze.
    Look at those buns!! Who could pass that up?
    Ham & Swiss Slider Burgers
    2 Tablespoons spicy brown mustard
    8 Tablespoons melted butter 
    1 teaspoon onion powder
    ½ teaspoon garlic powder
    1 teaspoon Worcestershire Sauce
    1 Tablespoon poppy seeds
    1/4 cup brown sugar
    1 pound ground chuck
    1 pound ground sirloin
    3 large garlic cloves, minced
    2 teaspoons Kosher salt
    2 Tablespoons vegetable oil
    12 slices deli ham
    12 slices swiss cheese
    1 package Pepperidge Farm Golden Potato Slider Buns

    Heat a gas grill to medium-high heat and set the oven to 350 degrees.
    In a small mixing bowl, stir together the mustard, melted butter, onion powder, Worcestershire Sauce, poppy seeds and brown sugar.

    To make the Burger Patties, add the chuck, sirloin, garlic and salt into a large mixing bowl. Mix until well blended, handling as little as possible to avoid overworking. Shape into 12 even patties to fit the bun size. Brush the grill rack with vegetable oil. Place the patties on the rack, cover, and cook about 3-4 minutes. Flip the burgers over and top with ham and then cheese. Cover and cook another 3 minutes longer, or until the patties are medium rare and the cheese is melted. 

    Place the bun bottoms on a large foil lined cookie sheet and brush them with a very thin layer of the melted butter mixture. Place the bun lids on top and then brush the remaining butter over them. Place in the oven and allow to toast for 5 minutes, watching carefully to prevent burning. 

    To assemble the burgers, remove the buns from the oven and place the burger patties on top of each bun bottom, top with the bun lids and serve immediately with lots of napkins!
    #RespectTheBunPromotion   #PepperidgeFarmBuns  

    Wednesday, September 27, 2017

    Pumpkin Amaretto Bisque with Blue Cheese Honey Crostini

    Yum
    Here in Texas, we are officially in the stage of watching everyone else on Facebook and Instagram enjoy the beginning of Fall, pumpkin spice everything and breaking out the scarves and cute boots while we continue to roast daily. So, even though it's in the high 90's and the humidity is out of control, The Home Town Cook’n Recipe Contest is gearing up for the holidays and they're looking for the best dishes to serve on Thanksgiving. I thought highlighting pumpkin in a savory way and adding a healthy amount of booze would brighten up the holidays even if Mother Nature decides not to cooperate in my neck of the woods. 
    Using canned pumpkin makes throwing this soup together quick and easy. I pureed mine in my Vitamix for an ultra velvety finish and the sweet and salty crostini are the perfect crunchy dippers!
    3 Tablespoons butter
    1 large onion, chopped
    2 sprigs fresh thyme
    2 ½ teaspoons salt
    3/4 teaspoon pepper
    3 large garlic cloves, minced
    2/3 cup Amaretto liqueur
    4 cups chicken stock
    4 cups pure pumpkin puree
    ½ teaspoon freshly grated nutmeg
    12 (1/4 inch thick) slices baguette
    3 ounces blue cheese
    2 Tablespoons honey
    ½ cup heavy cream

    Preheat oven to 400 degrees.
    Place the butter in a large soup pot over medium heat. Add the onion, thyme, salt and pepper and sauté for 5-7 minutes. Add the minced garlic, and cook for 2-3 minutes or until the garlic becomes fragrant. Pour in the Amaretto and bring the mixture to a boil. Allow to simmer until Amaretto is reduced by half.
    Add the stock, pumpkin puree and nutmeg. Simmer, over low heat for 15 minutes.
    While the soup simmers, place the baguette slices in an even layer on a cookie sheet. Place the bread in the oven and toast for 10-12 minutes, flipping them over halfway through. Spread the blue cheese evenly over the crostini and return to the oven for 3 minutes, or until the cheese is warm and melty. Remove from the oven and drizzle with honey.
    Turn off the heat, remove the thyme stems and stir the cream into the soup. Using an immersion blender or Vitamix, puree until smooth. Serve immediately with warm crostini.
    Serves 6

    Friday, April 8, 2016

    Lemon Almond Poppy Seed Scone Sticks

    Yum
    This is my entry for the Bake it With Rodelle Contest!
    The contest invited bakers to share their take on the delicious recipe they posted for 

    Lemon Vanilla Poppy Seed 2-Bite Scones and below is my take on their creation.

    One winner will receive a Rodelle prize pack filled with gourmet baking supplies, the best vanilla on the market, and international spice blends. The chosen winner will also receive a 12" Convection Digital Countertop Oven and aArtisan® Series 5-Quart Tilt-Head Stand Mixer - both in beautiful Cobalt Blue!
    • Lemon Almond Poppy Seed Scone Sticks
    • Scones
      1 cup all-purpose flour
      1 cup white whole wheat flour
      1/4 cup sugar
      2 tablespoons brown sugar
      1 tablespoon baking powder
      4 teaspoons poppy seeds
      Scant 1/2 teaspoon salt
      1 large egg
      1/2 cup buttermilk, plus extra to brush the dough
      2 tablespoons lemon zest
      2 teaspoons almond extract
      1 teaspoon vanilla
      1 stick cold butter, diced
      Glaze
      1/2 cup powdered sugar, sifted
      3 tablespoons vanilla flavored coffee creamer

      Add all dry ingredients to your KitchenAid Stand Mixer with the paddle attachment and mix on the "stir" (lowest) setting until well combined.
      In a separate bowl, combine the egg, buttermilk, zest, almond extract and vanilla. Whisk lightly and set mixture aside.
      Add cold, diced butter to the stand mixer and mix on the lowest setting for approximately 60-90 seconds. The butter should start to break into smaller pieces but not fully combine with the flour. Do not overmix!
      Stream the wet mixture into the dry ingredients while the mixer is on low ("stir") until a dough forms. This should take about 5-10 seconds of mixing.
      Turn off mixer, using a spatula, fold any remaining flour to the top and mix for a few more seconds. Do not overmix.
      Turn dough onto a well-floured surface and gently knead into a ball. If the dough feels overly sticky before kneading, heavily sprinkle with flour before kneading. Split into two even pieces and place one in a bowl in the fridge.
      Gently roll out or shape the dough with your hands into a rectangle about 3/4-inch thick. The rectangle should be approximately 4"x8". You will see pieces of butter in the dough and this is what you want - it will make your scones flaky and delicious.
      Cut rectangle into even slices and place on a parchment lined baking sheet with about 1/2 inch or so spacing between them. Repeat preparation steps with the remaining, refrigerated dough.
      Place scones on the pan in the freezer for 10 minutes.
      Preheat oven to 400 degrees.
      Lightly brush scones with buttermilk and bake for 12-15 minutes, until the edges are a deep golden brown and the tops are light golden.
      Let cool for 10 minutes then transfer to a cooling rack and let completely cool.
      Drizzle on 1 - 1 1/2 teaspoons glaze over each cooled scone. Top with extra poppy seeds if desired.
      For the Glaze
      Stir ingredients together until well combined. Mixture should be pourable but not too thick or too thin. 

    Tuesday, February 2, 2016

    Citrus Roasted Beet and Ricotta Toast

    Yum
    Hi there! Things have been super busy lately, and I have a lot of exciting news to share!
    My entry for Nordic Ware's photo contest won third place!
    Not a huge win, but exciting none the less. This one was purely decided by votes, not recipe, and I entered late but I'm still grateful to everyone that took the time to give me a vote and help me out!
    Congratulations, Lauren! You are one of our 3rd Prize Winners with 132 votes! Your photo looked absolutely delicious! We will be sending you an amazing  package of Honestly Cranberry Dried Cranberries, Seven Sunday’s Original Cinnamon Currant Muesli, a 12 Cavity Muffin Pan, and a Naturals Baker’s Half Sheet.
    I can't wait for it to get here!

    Citrus Roasted Beet and Ricotta Toast
    1 pound fresh beets
    3 Tablespoons olive oil
    6 ounces reduced fat feta cheese
    1 ½ teaspoons chopped garlic
    2 Tablespoons milk
    1 ½ teaspoons orange zest
    1/4 teaspoon salt
    ¼ teaspoon pepper
    2 teaspoons chopped fresh mint
    2 Tablespoons orange juice
    4 slices 12 Grain Bread
    1 cup baby arugula leaves
    4 teaspoons chopped pistachios

    Preheat oven to 375 degrees. Slice the tops and bottoms of the beets off, place them on a large sheet of foil and drizzle with 1 Tablespoon olive oil. Wrap the foil tightly, place on a cookie sheet and put in the oven for 45 minutes, or until a knife can easily pierce the beets. 
    While the beets are roasting, make the feta spread. Place the feta, garlic, milk, 1 Tablespoon olive oil, orange zest, 1/8 teaspoon salt and 1/8 teaspoon pepper in a small food processor and blend until the mixture is smooth. Place the cheese mixture in a small mixing bowl and stir in the mint. 
    Once the beets are tender, remove them from the oven, peel and cut them into ¼ inch slices. In a medium sized bowl, whisk together the orange juice, 1 Tablespoon of the olive oil, 1/8 teaspoon salt and 1/8 teaspoon pepper. Place the sliced beets in the bowl, and stir gently to coat them evenly.
    Toast the bread slices until evenly browned. Spread the feta cheese mixture evenly over each piece of toast, top with arugula and then layer the beet slices evenly over that. Sprinkle chopped pistachios over each sandwich and serve immediately. 
    Serves 4.

    And, since I don't know when to stop, here's another chance to vote for me! 
    I entered the Guac 'n Roll contest last year and didn't place, but as soon as the contest was over I knew what I would enter if they ever had this contest again! You only can enter one recipe, so narrowing it down to only one idea was hard! 
    It was right around the time I went to Nashville for the Pillsbury Bake Off and I was introduced to Hot Chicken. I had that on my mind ever since and knew exactly how I'd make it my own!
    Nashville, Hot Chicken and Johnny Cash all inspired my Ring of Fire-mole! 
    My entry for the#guacnroll2016 contest put on by @chefsroll &@avocadosfrommexico Fresh buttermilk guacamole paired with Hot Chicken spiced chips and crispy crunchy chicken skin. 
    Love is a burning thing Mr. Cash!
    If you'd follow this link and vote for me it would be very appreciated!


    Tuesday, May 12, 2015

    Mini-letta Swirls

    Yum
    I have always liked Muffulettas, and growing up in the New Orleans area, I have had my fair share of them. I'm pretty sure almost every single wedding, shower or party I went to growing up had some form of them served. Whether it was the huge whole loaf version or the cute little mini ones, they were always available. It combines so many things I love together- carbs, cheese, salty briny olives and a few delicious Italian cold cuts. It wasn't until I was in college that I had my first toasted Muffuletta and ever since then I don't want mine any other way!
    When brainstorming what I could make for an appetizer recipe contest, it wasn't hard to decide on this version of one of my favorite sandwiches
    The cheese gets melty and gooey, the bread is traded up for puff pastry, and with the olive salad as a topper instead of just an afterthought, I can load mine with as much as I want!
      Mini-letta Swirls
    1 Tablespoon flour
    4 teaspoons sesame seeds
    1 17.3 ounce package Puff Pastry Sheets, thawed
    12 ounces provolone cheese slices
    6 ounces thinly sliced prosciutto
    8 ounces thinly sliced salami
    1 Tablespoon Italian seasoning
    1/3 cup black olives, chopped
    1/3 cup green olives, chopped
    2/3 cup Giardiniera, chopped
    2 Tablespoons Italian dressing
     
    Pre-heat oven to 400 degrees.
    Sprinkle the flour and sesame seeds evenly on a flat surface such as wooden board or countertop. Unfold each sheet of puff pastry onto the flour and sesame seed mixture and gently press so the seeds adhere to the dough.  Layer each sheet evenly with the provolone, prosciutto and salami. Sprinkle each evenly with the Italian seasoning. Starting at the long side of the dough, roll up like a jelly roll. Tuck the ends under to seal. Using a serrated knife, slice each pastry roll into 12 slices and place, cut side up, on baking sheets lined with parchment paper. Bake for 18-20 minutes or until browned and golden.
    While the muffuletta swirls are baking, make the olive salad topping. In a small bowl, stir together the chopped black olives, green olives, Giardiniera and Italian dressing. Serve on the side as a topping for the swirls.
     

    Wednesday, February 4, 2015

    Delicious Breakfast Breads

    Yum
    I love baking new flavors of breads and muffins that are ready to grab and go on busy school mornings. My kids also love helping me bake so it's fun for all of us! I stumbled across this
     Glazed Apple Cinnamon Oatmeal Bread from Lovely Little Kitchen
    and knew that it would be the perfect recipe to use up the last of the applesauce I had hanging around in the fridge. The recipe makes two loaves, so you can keep one out and freeze one for later or share one with a friend. The glaze is made of applesauce and powdered sugar and keeps the loaves from drying out in the fridge. The bread is not overly sweet at all and I really loved the texture the oats gave it. Give it a try and let me know what you think! 
  1. 1 3/4 cups all purpose flour
  2. 1 cup old fashioned oats
  3. 1/4 teaspoon salt
  4. 1 1/2 teaspoons cinnamon
  5. 1 1/2 teaspoons baking powder
  6. 1 cup sugar
  7. 3/4 cup vegetable oil
  8. 2 eggs beaten
  9. 1/2 cup plain nonfat Greek yogurt
  10. 1 cup applesauce
  11. 1/2 teaspoon vanilla

  12.  
    Glaze
    • 2/3 cup powdered sugar
    • 1/4 cup applesauce
    Preheat oven to 350 degrees, and grease two loaf pans. I used two 1.5 quart Pyrex glass loaf pans. In a large bowl, mix by hand flour, oats, salt, cinnamon, and baking powder. Set aside.
    In another bowl, mix sugar, oil, eggs, yogurt, applesauce, and vanilla, then stir into dry ingredients by hand until just combined.
    Divide batter between the two loaf pans and bake for 43-45 minutes, or until a toothpick inserted into the center comes out clean.
    Remove from the oven and whisk together the powdered sugar and applesauce for the glaze.
    When the bread has cooled for a bit, remove from the pan onto a cooling rack and spoon the glaze over the top. Allow the glaze to set before slicing.


    Thursday, January 22, 2015

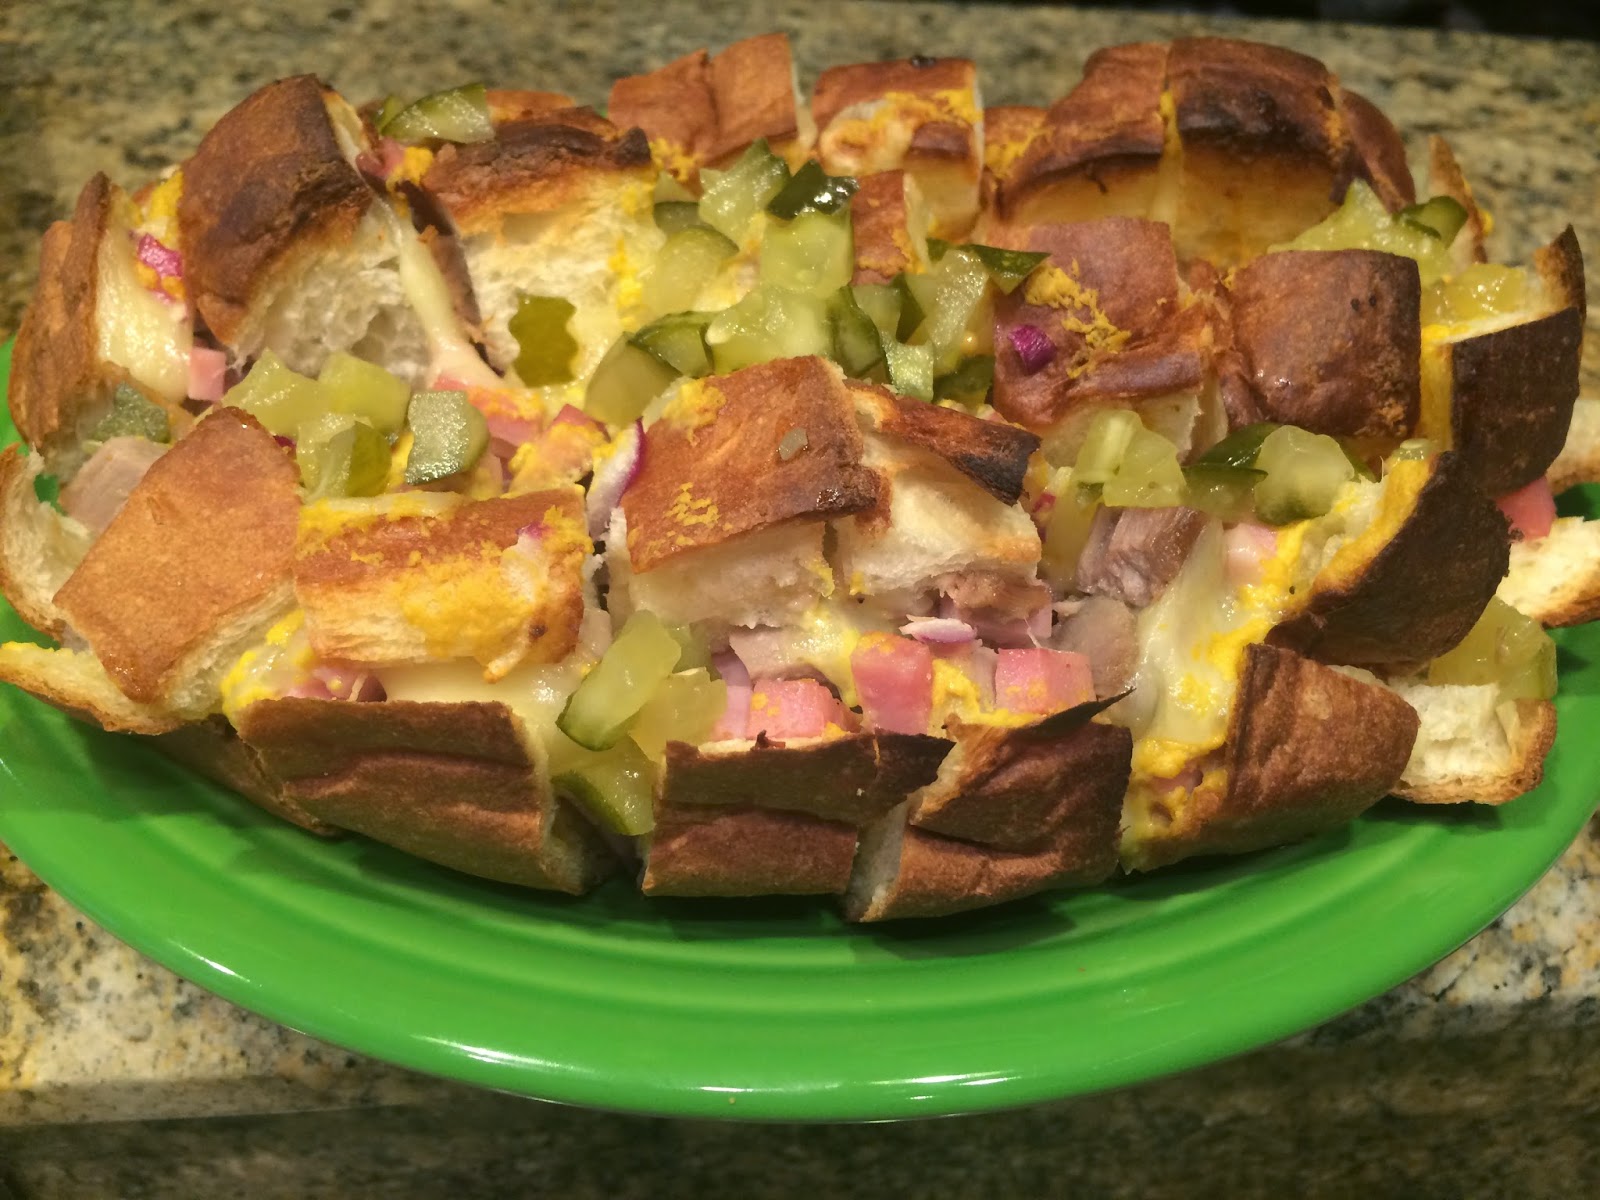
    Cheesy Cubano Pull Apart Bread

    Yum
    Holy deliciousness, I really think you're going to love this bread! It's the perfect thing to serve while watching the Super Bowl, or to bring to a potluck, or to make and eat all by yourself! I've seen so many different cheesy pull apart breads, and they're so yummy and cheesy and gooey I thought I'd make one with my own little twist to it
     It's super easy to throw together and when it comes out of the oven all gooey and warm it's impossible to resist!
    Pre-Heat oven to 375 degrees
     Place a loaf of sweet Hawaiian bread on a foil lined cookie sheet and cut a cross-hatch pattern into the top of the bread by slicing ½-inch grid lines into the bread, stopping about ¼-inch from the bottom of the bread so that it stays together, and then wrap the bottom with the foil to hold it up.
    Then, in a mixing bowl stir together:
    1/4 cup minced red onion
    8 ounces shredded swiss cheese
    4 ounces Hormel Cure 81 ham, diced
    4 ounces shredded pork
    Shove this mixture in between all the cuts of bread gently. In a small measuring cup whisk together 1/4 cup melted butter and 2 Tablespoons yellow mustard. Drizzle the mixture evenly over the bread and bake the loaf for 10-12 minutes
     Top with 1/3 cup diced pickle and serve immediately

    Sweet and Spicy Winter Crunch Salad

    Here is my "healthy doesn't have to be boring" entry for Miller's Recipe Contest and I think you're going to love it. ...